I own small 3D printer (M3D Micro) from kickstarter campaign. This was my first touch to the world of 3D printing. It was fascinating new toy.
I can not count the nights after work watching it how it’s printing. I have learned a lot in meantime.
My background as IT, especially in modelling, programming and electronics helped me a lot because 3D printing is not consumer ready yet. It requires at least technical approach and a lot of research and testing.
After months of learning and experimenting I slowly progressed and I was satisfied of the results. There were just a few failed prints. Even purchased heated bed – CoolCube 120mm x 120mm plus W1209 Digital thermostat to control it.
Quickly I reached the limit of the Micro. It is nice cute machine, prints great, but it has its flaws and weaknesses. It has small (109mm x 113mm x 116mm) build volume, no endstop switches, slow – 45mm/sec, not so accurate – backlash is hard to set (I still cannot get properly shaped circles), PLA only – no heated bed, the software is a nightmare and because it uses repetier protocol slang it is not compatible with anything else. Tech support in M3D is bad, you’ll get great help in their forum from other users, but not from tech support.
So, I decided to build my own, bigger and better printer.
After looking into a lot of designs I picked Prusa i3 as reference. I didn’t want to buy a kit, I wanted to build everything or bigger part myself.
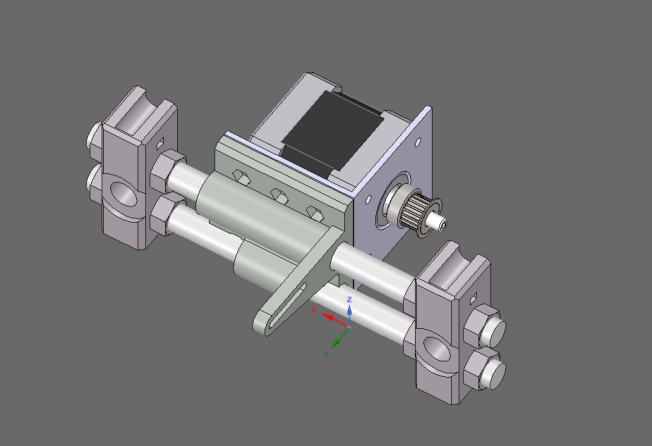
I used Prusa i3 vanilla design and ordered y-carriage from eBay, bunch of bearings, 5m GT2 belt and MK8 extruder head. The steppers I used were my biggest pleasant surprise. I got them cheap from eBay, they had 6 wires connector. There wasn’t much clear documentation about converting them to 4 wire connection for RAMPS.
When I received the extruder head I noticed that the stepper uses 4 of 6 pins. I tested same connection with the other steppers, first measured the resistance to figure out the exact pairs and then connected them to the driver board. They worked flawlessly. Than I took enough time to calibrate the stepper drivers (DRV8825) precisely. DRV8825 are much better then A4988 – 1/32 vs 1/16 stepping and they drive the motors very quietly. When printing stepper motors stay just a little bit warm, just around 25-30C, which is operational temperature. The drivers on RAMPS are cool.
Then the big CAD design challenge started. I decided to build my own frame out of PPR green pipes I had lying around. I said to myself “Let’s give it a shot. If doesn’t work I’ll order a metal frame”.

Prusa i3 – Spark Fusion
First I used freeCAD and later changed to DesignSpark Mechanical, both free to download. I managed to build the whole printer in the CAD software first, align everything properly and making sure there is enough clearance around connectors and tubes so they fit tight. I used the STEP files from Prusa Einstein reworked i3 git repository and modified some of them.
With the steppers I ordered 4 x 90 degree brackets for them and I wanted to use them. You can find my modifications my designs at thingiverse.com.
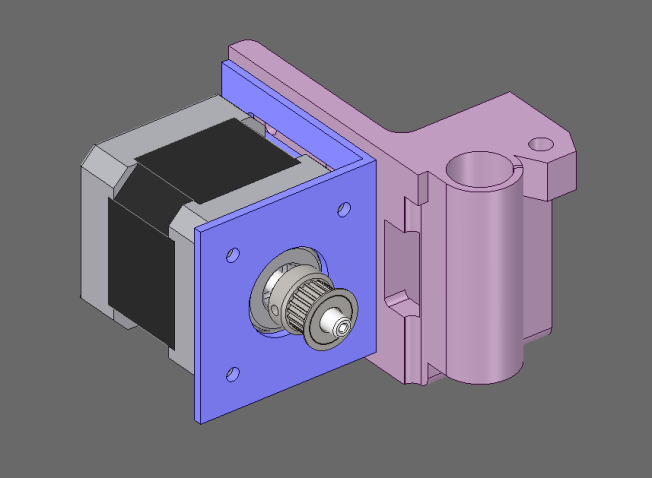
X Carriage ( Bracket Adapter Assembly)
Y Carriage (Bracket Adapter Assembly)
The Micro did great and luckily there weren’t that much bad prints. My main concern was the PPR tubes flexibility. How it will affect printing process? Is there going to be layer shifting, are they going to be sturdy enough? I was very surprised of the results. Flexibility actually helped a lot to kill the movement vibrations acting as shock absorbers. Also DRV8866 stepper driver boards helped a lot. I left default 1/32 stepping enabled and that gave back great results.
I’ll post more information and my design plans in my next post.
